
Custom Built Lightsabers
Here are a few of the design elements and detailing processes which I typically integrate into my sabers. Some of these specialties have become signatures of my work. Incorporating these various elements together creates intricate saber details which "make sense" and are visually distinct.


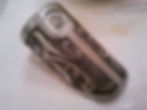
Hand Scribing
This painstaking process involves masking a part with clear packing tape, and then slowly cutting out selected areas with an X-acto knife. The exposed area beneath is then Acid Etched, and the taped areas remain unharmed. Straight lines which are parallel to each other are difficult to obtain...one slip of the knife and the entire design is ruined and you have to start again...try it!
Acid Etching
After masking and scribing, Acid Etching eats away at any area of metal which isn't still covered by the clear packing tape. This gives a fantastic surface detail which breaks the monotony of radial chunks of aluminum hilts. Any design can be obtained, from decorative patterns, to the next element...


Simulated Circuitry
As my tests with scribing and etching have evolved, I have introduced a new sub-genre of surface detail for my sabers which I am calling "Simulated Circuitry" or "SimCirc" for short. This pattern is cut (freehand) out of packing tape and then acid etched to give a recessed texture. The layouts loosely reference real world circuit boards to simulate a "real" working lightsaber. The etched pathways are often filled with Gold Leaf, which is another detail element I am incorporating into my saber work.
Wood Veneer
This is a new technique I've been working on, inspired by Wookies and Orgus Din's saber from The Old Republic. The most difficult aspect of applying the veneer is ensuring uniform adhesion onto the aluminum body, to maximize durability. I've developed a bonding technique which allows the beauty of a wood surface without worrying about flex or cracking at all during very heavy dueling.
Laser Etched Steel Parts
I am always concerned with the "detail density" of my sabers, especially their interior Cores, which in my opinion should be detailed in a purposeful way. Laser or Photo etched parts, in steel, copper, or brass, are used in my builds as backdrops for my signature piping details. The result is a layered look which is intended to be somewhat reminiscent of the Original Trilogy's greeblies seen on the side of the Falcon or Star Destroyers.
Brass Inlays
When the design allows for it, I enjoy inlaying brass or other materials into the surface of various saber sub-assemblies. Grooves are created with my vertical mill, and the material is then filed to shape and inlaid. Sometimes, these inlaid panels can be removed to access hidden switches or wiring pathways to service a saber conveniently without having to disassemble it further.
Multi-Point Backlighting
Continuing with my references to classic Star Wars design cues, I have introduced Multi-Point Backlighting to my sabers. This technique creates the illusion of an illuminated "control panel" or other surface containing several points of light, which really just being backlit by a single accent LED. This allows many points of light beyond the Crystal Focus' usual 9-10 accent LED limit. The walls and pillars of the Death Star, or the Falcon's cockpit, or the Carbonite Chamber's floor grating, are just some of the inspirations for this design element which add a unique twist to my work.
Free Floating Construction
The Free Float construct has become somewhat of a signature feature of my work. This layout allows a saber's outer body (usually an MHS body part) to rotate and be completely unscrewed cleanly off a saber without disturbing any of the wiring. This allows for larger display area for "Epic Reveal" type chassis. This in turn necessitates plunger and spring switch assemblies, which insert an activator pin into the flush mounted internals when depressed, but when released, the pin retracts away from the internals to allow the outer body to spin freely and be removed.
Powder Coating
Powder Coating is a popular method to add color and sheen to sabers. Gemini Concepts first powdercoated a part for me a few years ago, and more recently Vaders Vault tipped me off to an economical home-based powder coating system. The finish is very durable and is readily available in many colors. I prefer a balance of translucent powders (essentially tinting the polished aluminum beneath), and solid colors of various metallic finishes. I also try to infuse pops of non-metallic colors, like reds, purples, greens, etc, so the overall saber doesn't look too monochromatic.
Piping/Detailing
Piping has always been a signature feature of my sabersmithing. Various thicknesses of brass/aluminum/copper/steel tubing is used to create "energy pipelines" which reference the surface detail of, for example, a Pod Racer. With each saber I try to refine my technique and diversify my design patterns, so each saber is unique yet still identifiable as my handiwork. Many sabersmiths cultivate their own specialties which are very inspirational to the saber enthusiast community as a whole.